Showing posts with label Mother's Day Series. Show all posts

Sunday, 22 April 2018

Embossed Vellum Overlay for Mother's Day | ft. Lawn Fawn "Flutter By"


Hi everyone, thank you for stopping by. I hope you're having a great day.

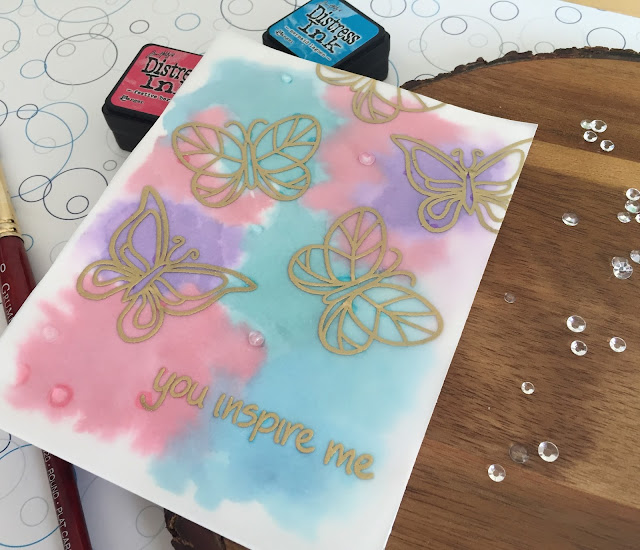
Today I have a card (and video!) featuring a gold embossed vellum overlay on top of a brightly watercoloured background. This is pretty much how I imagined it in my head when it came to me.


I recommend watching in HD over on YouTube!

There are a few things I would do differently if I were to redo this card; chances are I will make another of these, it was just fun to play around with the watercolours.


I think with a different colour palette, this technique could be used for pretty much any type of card. I'm looking forward to trying this in more earthy tones for a masculine card.

I hope you like today's card (and Video!) and are inspired to create something of your own. If you haven't already, please follow me on the right side bar, over on Facebook and on YouTube! Drop me a line in the comments section below and let me know what you think.

This card is for:
Simon Says Stamp Wednesday Challenge

Monday, 9 April 2018

Mother's Day Wishes | ft. Simon Says Stamp "Beautiful Day"


Hi everyone, thank you for stopping by. I hope you're having a great day.

While I know it's a little early, today I have a lovely Mother's Day card featuring Simon Says Stamp "Beautiful Day" stamp set. I got this set in the April 2018 card kit, and though the kit is sold out, you can certainly still purchase the set individually. There is so much going on in this set, it is definitely worth a look.


I had zero plan when I started out this card set, so there's no video. I kind of wish that I had filmed anyway because it turned out so wonderfully.

To begin, I stamped the butterfly and the leaves with Memento Tuxedo Black ink on 110lb Copic-friendly cardstock and coloured them with Copic markers.

I cut two inch strips of cardstock in each of the colours that I coloured the butterflies, and used a lined stencil with the same colour ink to create a tone on tone patterned paper.

Each of the cards is a top folding standard A2 sized card base made with the same 110lb cardstock as I stamped the images on.

I stamped the greeting from Lawn Fawn's "Mom and Me" stamp set with Memento Ink. I used clear Wink of Stella over the whole of each butterfly, then used Glossy Accents by ranger over the darker dots and teardrop parts on the wings. Finally to finish off the cards I used some coordinating crystals from Studio Katia.

I hope you like today's card and are inspired to create something of your own. If you haven't already, please follow me on the right side bar, over on Facebook and on YouTube! Drop me a line in the comments section below and let me know what you think.

Friday, 28 July 2017

Late for Mother's Day | ft. Wplus9 "Beautiful Bouquets: Dahlias"


Hi everyone, thank you for stopping by. I hope you are having a great day.

As I mentioned in a previous post, I was going through a lull when Mother's day and Father's day rolled around, so today I have a card that I had given to my mom for Mother's day way back in May. Seems so long ago, now.


To begin, I stamped the image from Wplus9 using Memento Tuxedo Black ink on 110lb Copic-friendly cardstock. I turned the panel around and then stamped it again. I wasn't concerned about the overlap because it was going to be covered by the cross piece.

I then coloured the image using Copic markers. I wanted something very delicate, so I started at the base of each petal with a very light pink, then pulled it up with an even lighter shade. While it looks like the entire petal is coloured, the ends are actually left completely white, this lends a softness to each petal. I used very light greens for the leaves.

For the cross piece, I stamped the letters using CTMH's "Framework Alphabet" and used the same pinks to create an ombre look. I matted the cross piece with some gold glitter paper and adhered that directly on to the main panel. I had considered popping this up on foam tape, but in the end I decided to just have it flush against the panel.

Finally, I added a scattering of iridescent sequins and adhered the panel to a standard A2 sized card base.

I hope you like today's card and are inspired to create something of your own. If you haven't all ready, please follow me over on the right sidebar. If you are viewing this via mobile device, scroll to the bottom and tap "View Web Version" first. You can also follow me over on Facebook. Toss me a line in the comments section below and let me know what you think.

Monday, 10 July 2017

Something for Mom | ft. Clearly Besotted's "Friends Forever"


Hi everyone, thank you for stopping by. I hope you are having a great day.

I thought I would mix things up a bit today and toss in a card that I made a while ago, but never managed to get posted here. You may have noticed I didn't do a whole lot of posting in the first half of the year. I don't know why. I was still making cards, I was still going through Pinterest and Instagram for inspiration, I just didn't have the motivation to actually post anything.

Anyway, to make up for that, you'll probably be getting a mash-up of card themes basically whenever I want to post them! YAY!!


To begin, I stamped the floral image from Clearly Besotted's "Forever Friends" using Memento Tuxedo Black ink on 110lb Copic-friendly card stock. I then masked off the image and sponged in Spun Sugar Distress ink with a light hand to create a halo around the image.

I then removed the mask and coloured the flowers with Copic markers. I mounted that on a pale green piece of cardstock for a border and used the same green for part of the greeting - which was stamped in VersaMark and heat embossed with detail white powder.

The "Happy" is from my die stash and I cut a few from regular cardstock and then one from foiled paper to have a raised, super shiny part to the greeting. Unfortunately the camera didn't pick up the foiling very well, but in real life this was amazing.

Finally I adhered everything to a standard A2 sized card base, and to finish it off I added some drops with irRESISTible Pico embellisher in Wedding White and some clear using Glossy Accents by Ranger.

I hope you like today's card and are inspired to create something of your own. Don't forget to follow me over on the right sidebar, if you haven't all ready, so you don't miss out on any future posts. Toss me a line in the comments section below and let me know what you think.

Thursday, 5 May 2016

Mother's Day 2016 Series - Card 11


Hi everyone, thank you for stopping by. I hope you are having a great day.

You may remember this image from the Apple Blossom Birthday post from a while ago, I have a slightly different take on it for today's card. I can honestly say Clearly Besotted is fast becoming my favourite floral stamp company.

I went with softer colours today to show a much more delicate side of the Zig Markers (surprise! using them again).


To create this card, I began by prepping the watercolour panel with my powder tool and heat embossing the floral image in white embossing powder. I wet each of the areas and dropped in colour from the markers to create an incredibly soft look.

To create the halo around the image, I wet the area in sections and dropped in Tumbled Glass Distress Ink.

The greeting banner is heat embossed with gold on a strip of vellum. To finish off the panel I used a scattering of pearls.

I hope you like today's card and are inspired to create something of your own.

Wednesday, 4 May 2016

Mother's Day 2016 Series - Card 10 | ft. Clearly Besotted Stamps


Hi everyone, thank you for stopping by. I hope you are having a great day.

The inspiration provided by Michele Ferguson (you can see her card at the bottom of the post) was wonderful. I love the potted flowers, and after I started I just couldn't stop. If one is good, then three must be better, right?

Moreover, I can't seem to get enough of either the florals by Clearly Besotted or the Zig Markers. They blend so amazingly, and the colour they give off when mixed with water is beyond anything I could have imagined when I first read about them.

If you haven't tried them out, I highly recommend picking up a couple. Unlike Copics (also wonderful) you can get various shades with just one marker.


To create this card, I began by stamping the vases from Lawn Fawn's "Our Friendship Grows" stamp set. I then masked them off and stamped each of the floral images from Clearly Besotted's "Miniature Florals Collection" using CTMH Archival Black Ink on 140lb cold press watercolour paper.

I coloured them with Zig Clean Color Real Brush Markers. I forgot to write the colours I used down. Sorry, guys!

I stamped the greeting using the Archival ink as well, to ensure that the blacks matched. I mounted the panel on a standard A2 sized card base using super sticky tape.

To finish it off, I added clear Wink of Stella to the petals of the flowers. Unfortunately, the picture didn't pick it up. But in real life, it is SUPER shiny.

I hope you like today's card and are inspired to create something of your own.

This card is for:
Inspired by Michele Ferguson's Beautiful Card:

Mother's Day 2016 Series - Card 9 | ft. Lawn Fawn Stamps


Hi everyone, thank you for stopping by. I hope you are having a great day.

For some reason sunflowers always remind me of Moms. I don't know why. Perhaps because they are so bright and cheerful, and those are the best memories of Moms. Standing tall, watching over us and smiling down.

Last year every Mother's Day card I created had sunflowers. Those aren't available here, as I didn't start this blog until October of last year. If I do find pictures of them, perhaps I'll post them.


To create this card, I began by stamping the Lawn Fawn floral images with CTMH Archival Black ink on 140lb cold press watercolour paper.

I used Zig Clean Color Real Brush Markers to colour the image. Bright Yellow and Lemon Yellow for the petals, Deep Green for the leaves and the stem, Dark Brown for the centre of the flower and the pot was coloured with Brown and Orange to create a terracotta colour.

The soft blue halo around the flower was done by wetting the area and dropping in Tumbled Glass Distress ink and allowing it to air dry.

The greeting (also Lawn Fawn) is heat embossed with gold embossing powder on a strip of vellum. I added the ribbon down the side and the scattering of sequins to finish off the card.

I hope you like today's card and are inspired to create something of your own.

Tuesday, 3 May 2016

Mother's Day 2016 Series - Card 8


Hi everyone, thank you for stopping by. I hope you are having a great day.

Welcome to the eighth installment in the 2016 Mother's Day series. Apparently this one is sneaking up on me as well. I can't believe it is less than a week away. Luckily I'm on the ball for this one, and I have a few ready to go for you.

I borrowed this die set from a friend last week, with grand ideas on what was going to happen. This was not one of those ideas. This sort of just happened. (And to be honest, I have not yet completed a single one of those grand plans.)


To begin, I used Distress Ink on some heavy-weight Bristol Smooth cardstock. For the rose, I used Worn Lipstick and for the leaf sprig I used Mowed Lawn, then die cut them out. I used the positive portion of the die cut (negative? The part you would normally throw in the recycling) as a stencil to shade directly on the card panel. I used Spun Sugar and Twisted Citron.

Once they were dry, I adhered the die cuts over the shaded area to create a dimensional two-toned rose.

The panel is a shimmering white cardstock. I really like this cardstock as the Distress allows for the shimmer to shine through. The greeting is stamped using Memento Tuxedo black ink.

To complete the card, I added a scattering of soft pink sequins across the panel.

I hope you like today's card and are inspired to create something of our own.

Monday, 25 April 2016

Mother's Day 2016 Series - Card 7 | ft. Zig Clean Color Real Brush Markers


Hi everyone, thank you for stopping by. I hope you are having a great day.

Welcome to the seventh card in the Mother's Day series. When I started this card, I had no idea it was going to be a Mother's Day card. I have been really putting out a lot of Thinking of You cards, but by the time I was done painting the image, this card just screamed Mother's Day.

This is my first attempt at applying the Zig markers directly to a stamp, and overall I'm pretty satisfied with it, I've had some success with this technique using distress markers and wanted to give it a try with Zig. The internet and youtube have a lot to say when it comes to this technique, but really you won't know if it works for you until you try it for yourself.

I highly recommend giving it a try before dismissing it. Maybe I lucked out, but it seemed to work out pretty well for me. Even though someone else says it doesn't work, it may just be the exact look you are going for.


To create this card, I began by scribbling 032 Persian Blue directly on to the stamp and applying it to 140lb cold press watercolour paper. I then masked this off, and used the same technique with 048 Emerald Green for the leafy stamp.

I removed the mask and used 036 Light Blue to add a little contrast to the petals, with a damp brush I pulled the lighter colour down into the darker colour and let the water do it's magic. I added 045 Pale Green around the foliage and brought the greens together the same way.

To create the greeting banner, I used a banner die cut with a coordinating cardstock and metallic gold embossing powder for the greeting.

As usual, I felt the white area was too white, so I added a halo around the image using 026 Light pink, and pulling the colour outwards. When creating the halo, I have found the most effective way is to wet the paper first then drop in the colour and pull it out, otherwise the colour may be too intense around the image and it may not be what you are looking for. Maybe I just need more practice. I added a scattering of sequins and clear dots for interest.

I hope you like today's card and are inspired to create something of your own.

This card is for:
Simon Says Stamp Monday Challenge: Show Us Your Metal
Simon Monday Challenge Blog

Thursday, 14 April 2016

Mother's Day 2016 Series - Card 6


Hi everyone, thank you for stopping by. I hope you are having a great day.

Welcome to the sixth installment of the Mother's Day 2016 Series.

As a child living on a farm, I was always so amazed by how many stars were in the sky at night. Being away from the lights of the city really lets you see how expansive the sky is, and I think it something everyone should experience at least once in their lifetime.

I remember asking my father how many stars there were, and he told me that if I could count every night for the rest of my life, I would never even come close to counting all the stars in the sky. That is the inspiration for this card.


To create this card, I began by sponging Chipped Sapphire and Seedless Preserves Distress ink onto regular cardstock. I then used the splatter technique and a medium sized paintbrush to create the smaller stars in the background. Because this is not watercolour cardstock, you must use a very light hand when splattering so that the paper doesn't warp too much.

Once that was completely dry, I used my powder tool to prep the panel for heat embossing. I used white powder to heat emboss the greeting.

The stars were added last using the silver Delicata pigment ink. I adhered the panel using strong double sided tape, to ensure that it would lay flat on the card base.

The sentiment on the inside reads: "Count the stars in the sky."

I hope you like today's card and are inspired to create something of your own.


Tuesday, 5 April 2016

Mother's Day 2016 Series - Card 5


Hi everyone, thank you for stopping by. I hope you are having a great day.

I love this fuchsia image from Clearly Besotted so much that I just had to create another card. I wanted to make it a bit different, so I decided to no-line watercolour the image. This technique makes the image appear as though it wasn't stamped at all, and gives a softer look than stamping with a darker ink.


To create today's card, I began by stamping the floral image using Antique Linen Distress ink on 140lb cold press watercolour paper. I then used Distress inks to watercolour the image, and used Tumbled Glass to create a halo around the image.

I then stamped the greeting using Golden Glitz Delicata ink.

I adhered the panel down using strong two-way tape on a standard A2 size card base. I was a little unhappy about the white space and added a scattering of sequins to add interest and fill it up a bit.

I hope you like today's card and are inspired to create something of your own.

This card is for:
Simon Says Stamp Wednesday Challenge: Anything Goes
Simon Wednesday Challenge Blog

Mother's Day 2016 Series - Card 4


Hi everyone, thank you for stopping by. I hope you are having a great day.

Welcome to the fourth installment of the Mother's Day 2016 Card series. Today I thought I would also include a card made for the Mom of our Moms (and Dads); a card for Grandma.

I thought it would be nice to include something for Grandma because while we do have a Grandparents Day, we sometimes forget that Grandmas are still Moms.

Card for Mom

Card for Grandma

To create today's card, I began by stamping the floral image on Copic friendly paper, using Memento Tuxedo Black ink and on a piece of masking paper. I then covered the image with the mask, and sponged the background panel using Tumbled Glass and Milled Lavender Distress ink.

I then coloured the image using Copic markers. I wasn't sure of the colours for fuchsias so I did some googling. Once the colouring was complete, I used a clear Wink of Stella glitter pen over the blossoms and then glossy accents to give them a shine.

For the greeting, I used some stamps from Lawn Fawn's Mom and Me stamp set, using Memento for the black (so it would match) and Golden Glitz Delicata for the "Mom" and "Grandma".

The panel was die cut using the largest of Lawn Fawn's stitched rectangle dies. I then adhered the panel onto a standard A2 card base.

I hope you like today's card and are inspired to create something of your own.

This card is for:
Lawnscaping Challenge: Beautiful Florals

Thursday, 31 March 2016

Mother's Day 2016 Series - Card 3


Hi everyone, thank you for stopping by. I hope you are having a great day.

Welcome to day three of the Mother's Day 2016 series! When I think about Mother's Day, it still feels so far away, but I thought that with Easter too, and that creeped up on me before I knew it; and I don't really want that happening again, I didn't get nearly as many posts in that series as I wanted. Sorry guys.


To create today's card, I began by sponging Twisted Citron and Peacock Feathers Distress ink onto the panel and the tag.

I sponged the same colours onto a scrap of paper and die cut the butterflies. I covered the butterflies with glossy accents and set them aside to dry.

I used a sheer ribbon around the panel and up through the hole in the tag. Before tightening it, I added foam tape to the back of the tag to keep it in place.

I then put the panel onto a coordinating piece of cardstock cut slightly larger, then onto a lighter coloured piece cut to a standard A2 card base.

Once the butterflies were dry I adhered them with Ranger Multi Medium Matte to ensure they weren't going anywhere.

I hope you like today's card and are inspired to create something of your own.

Monday, 28 March 2016

Mother's Day 2016 Series - Card 2


Hi everyone, thank you for stopping by. I hope you are having a great day.

Welcome to day two of the Mother's Day series for 2016. I actually created this card a couple months ago for a friend who wanted to get a jump-start on the holidays for the year.  Usually when I create a card that I really like, I'll post it quickly. In this case I decided to wait until the series started.


To create today's card, I began by sponging Tattered Rose and Milled Lavender Distress ink over the entire back panel. I used the same distress inks to sponge colour onto the tag.

I then used the same colours, but in distress makers to colour directly onto the flower stamp. I also added a darker shade of pink to add depth, and two shades of green for the stem and leaves. I stamped this in first, second and third generation on to panel. When doing this, you have to work very quickly otherwise the maker will dry on the stamp and your impression won't be clear. Immediately before stamping, huff on the stamp to add moisture.

I wrapped the ribbon around the panel and through the hole in the tag. I added foam tape to the back of the tag and put it in place before tying the ribbon in place.

I then mounted the panel on a dark pink piece cut slightly bigger and then on a lighter pink piece cut to the same size as the card base.

Finally I added a scattering of pearls to finish it off.

I hope you like today's card and are inspired to create something of your own.

Sunday, 27 March 2016

Mother's Day 2016 Series - Card 1


Hi everyone, thank you for stopping by. I hope you are having a great day.

Now that Easter is over, it's time to turn our attention to Mother's Day. That being said, welcome to day one of the 2016 Mother's Day Series. Today's card is featuring the new Mom and Me stamp set from Lawn Fawn, as well as a few "new to me" items that I am just loving!


To begin, I stamped the owl on Copic friendly paper and coloured them with Copics. I don't have the coordinating dies for this set, so I fussy cut the image out and put foam tape on the back.

I stamped the tree stump directly onto the card base using CTMH Saddle ink with the MISTI. I also stamped it a second time on some post it tape to create a mask. 

After putting the mask over the tree stump, I stamped the tufts of grass. The mask makes it appear as though the grass is behind the stump. I used the larger flower and used first, second and third generation stamping to vary the shades of red. I stamped the butterflies using CTMH Honey ink. 

I stamped the "Happy Mother's Day" greeting from Lawn Fawn's "celebration scripty sayings" using Golden Glitz Delicata Ink from Tsukineko. The picture does not do the shimmer of this ink justice. I have tried several metallic pigment inks, and this is by far the best I have every seen. 

I hope you like today's card and are inspired to create something of your own.

This card is for:
Fusion Challenge: Everything's Owl Right


Update:
This card was selected for Honorable Mention on the Fusion Challenge!